How To Build a Woodworking Workbench
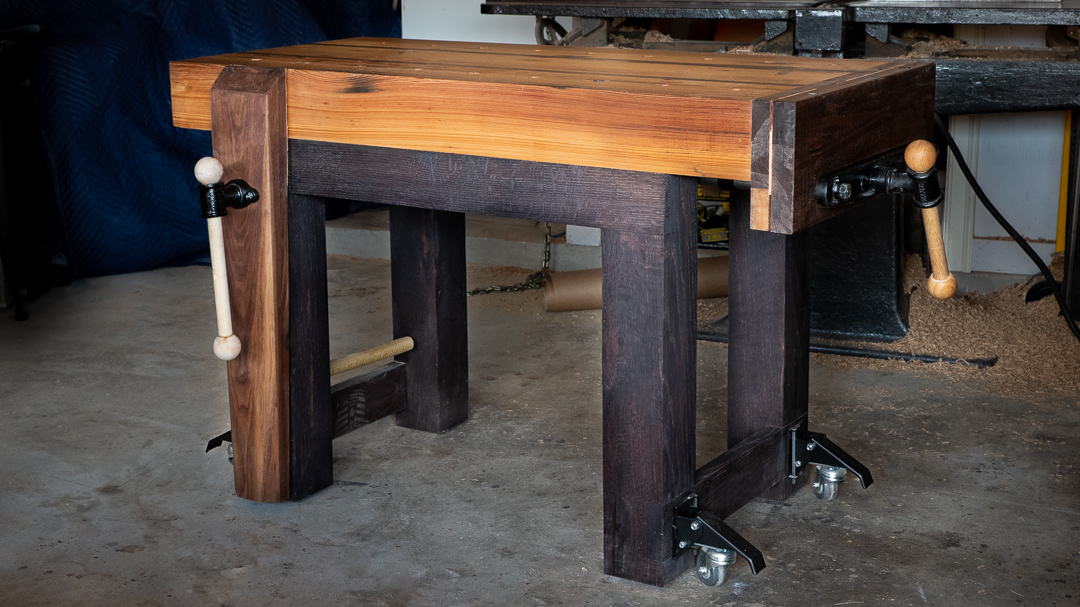
This is my take on a hand tool woodworking work bench for a hybrid woodworker in a garage shop! I sized it to not take up too much room, be easily movable, but be solid enough for any task I'd need from a workbench when woodworking with hand tools.
This post contains affiliate links, for more information see my disclosures page.
Plans are available here!
Videos referenced: Jay Bates Flattening Video
Why a Hand Tool Bench
The first bit of this you’ll be seeing me break down and mill the materials for the top of bench, some old cypress barn beams and some walnut. Check this out if you’re not familiar with it, but it’s basically making lumber be flat, straight, and square.

If these seem a bit large for a top, it’s because they are, but I’ll cover that later. First, why I’m building this.I’ve been enjoying using hand tools more and want to spend more time with them and improve my skills, but one of the things that’s hanging me up is not having a good bench for hand tool work. While a lot of folks turn a hand tool bench into a rights of passage work of art, it doesn’t have to be.
So what makes a hand tool bench different from any other work bench? Well, basically it just needs to hold the work and not move. When I do power tool and machine work, that’s easy for my bench because I’m mostly just doing lay out, glue ups, drilling, screwing, or nailing on the bench - none of which really puts much force into the bench, and if it does move some, it doesn’t matter.
It’s a whole other thing with a hand tool bench, because when the piece gets clamped to the bench it basically becomes part of bench so all the force applied by planing, sawing, or chiseling gets transferred to the bench. That force can be applied from many directions, so the joinery needs to be beefy to prevent racking and wobbling. Imagine if slack in every joint wiggled with every stroke of a saw, it’d be impossible to cut a straight line - which is challenge enough to me with a hand saw at a good bench.
Just having tight joinery isn’t enough though, hand tools can require a fair bit of force and it’s best if that force goes into cutting instead of pushing your piece around. The piece probably doesn’t have enough mass to politely lay on the bench while it’s mutilated, so it gets clamped to the bench somehow, which means the bench needs to have enough mass to resist the force. Even more so if like me you tend to work with dull tools out of laziness, inability to sharpen, or some combination of both.
I don’t do a lot of hand tool work and have a small shop, so I’m doing a fairly small bench, only about 2’x4’. Besides the obvious size limitations of a bench that small, one of the downsides is it won’t be very heavy if I build it to normal proportions. So, I’m way over sizing all of the components, not because they need to be that large for strength, but simply to add mass.
Making the Workbench Top
These beams had some pretty severe cracking that I decided to stabilize, they probably would’ve been fine, but since I’ll be beating on this bench pretty good I don’t want to press my luck. I stabilized them using Total Boat 2:1 epoxy and used some dental syringes to help me get the epoxy in the cracks easier without wasting a lot of epoxy.
This is my first time using the Total Boat and it flows a lot better than other epoxies I’ve used before, but it still takes a while for it seep into these cracks so it took a couple of sessions to get them filled up.
After the epoxy was done I milled the last side of the beams at the table saw and then jointed it with my hand plane so I can get the best possible glue seam on the top.
You may be wondering, why the walnut racing stripes in the top? If not, you should be. Unlike an import car, they won’t make this bench go any faster. The reality is my cypress beams finished out a little narrower than I needed to be able to fit my end vise and I thought the spacers would like better in the middle than on the outside.
But why walnut, isn’t that a waste of expensive lumber? Well, yeah. But walnut I threw some walnut trim on assembly table because I had some awkward scrap, and then it went on my router table to match, and now it’s an expensive shop furniture theme that I’m committed to seeing through. I mean, nobody likes a quitter.
Once the top was glued up, I needed to square off the ends and cut it to length. I started this process by making cut with my track saw and then cutting the rest of the depth by hand. Then I remembered I had a slider miter saw. So I carried it over there and lucked out. My saw was able to cut through the entire depth, but didn’t slide far enough to get the whole thing. So I flipped it over and cut from the other side, and that left me just a little bit to cut off by hand.
Workbench End Vise Installation
For work holding I’m going to have two vises on this bench, a quick release end vise from Rockler, and a leg vise. The end vise gets attached to the bottom of the bench, so I figured it’d be easiest to work on that while the top is still.. mobile.
I started by adding a vise face piece to the bench with some long lag screws and then just followed the directions that came with the vise. It’s essentially drilling through holes and pilot holes for screws.
A few handy tips though, is you can use a forstner or brad point bit the same size as the hole in a piece of hardware to transfer the location of the center of that hardware hole to a piece you need to drill. It’s a lot more accurate than guessing with a pencil.
Also, if you’re drill big holes and don’t want blow out on either side you can either clamp a spoil board on the backside of your piece, or as soon as the tip of your bit comes through the wood, stop and drill from the opposite side. Once the vise was all assembled, I planed the bottom of the both of the vise faces flush.
Making the Workbench Base
Now it’s time to work on the base. This will all be made from red oak. Most of it is from a red oak that I got from a tree service locally just for this project a few years ago. I did that so I could have hefty single piece legs.
My chainsaw work isn’t so great though, so they needed a lot of work at the jointer to get a flat face, and then I used the bandsaw to hog off most of the waste before milling them square.
I didn’t have enough red oak from that tree to do the long stretchers, so I laminated together some scrap red oak from another project to be the long stretchers.
To keep myself straight I laid out my legs to figure out which would be the outside faces and then rough marked where each joint will be cut on the legs. The base will be lapped joints, which means I’m just cutting notches into the legs that the stretchers will fit into.
The rough marks just make sure I cut the correct side of each leg, I use a fancy double marking gauge to mark the actual cut lines. The nice thing about using marking gauges is there’s no math to mess up and because the dimension is duplicated instead of measured, the marks are stupid accurate.
To cut the joints I set the depth of my cut to the thickness of the stretchers, then made a series of cuts where the notch goes. This would’ve been a lot faster with a dado stack but I wanted to show it can be done with a regular blade. Okay, actually, I was just too lazy to set up my dado stack which was stupid because with 8 cuts it would’ve been worth the set up time. But, you can see how you could also do this with a circular or even hand saw.
To remove the little pieces left behind I just beat them with a hammer and then pried them with a screwdriver to break them loose and then used a chisel smooth out the bottom.
The top stretchers will be flush with the top of the legs, so when I cut those I make sure to take a cut at the very top. If I didn’t, when I break out the chips there’s no guarantee it’ll break off flush the bottom, it may break out more wood than I want. It’s not likely, but that careful cut is cheap insurance.
I did have a little accident that chew up part of one leg, but fortunately it was an easy repair. I just cut out the leg flush with the joint and then clamped a stretcher in place and glued and off cut from the stretcher as a patch. I used 5 minute epoxy for it’s quick set up time so I could keep moving, and after letting it cure a while I cut the patch flush with the bottom and the leg and now there’s no telling there was ever a repair.
Next is the base glue up, so I cut the stretchers to length and then glue and clamp it all together. The joints are tight enough there’s not really room for thing to be out of square, but I keep checking square as I go anyway.
I let the glue dry overnight and then sand the base down before dying it ebony. If dying hardwood is the kind of thing that gets your blood pressure up, you might want to subscribe and then click away before you see how I attach the top.
Installing the Workbench Top to the Base
Feel free to leave me a comment about how these L brackets ruin this whole project and I should’ve done through dovetailed tenons. That is an amazing way to build a bench. But, I have a base with fairly wet lumber and a very dry top so I needed a good way to let the base and top and move independently from each other.
Also, tops are normally laminated with the grain in such a way that seasonal movement just changes the thickness of the top. Because I used those big beams which saved me a small fortune in glue and time spent clamping glue ups, my bench top will not move consistently.
Flattening the Workbench Top
With the bench top mounted, I cut the ends of the vise face flush with the bench top and then set to smoothing the top. If you want details on this process, Jay Bates did a great on how to do it.
Basically, I started with a scrub plane and worked across the table and then diagonally along the table. Then I switched to my jointer plane and went diagonally across the table and then along it’s length, and finished up with my smoothing plane. An alternative would be setting up a router sled and flattening it with a router, but that makes a huge mess and if you’re building a hand tool bench you probably have hand planes, soo… yeah.
Adding Dog Holes to the Workbench Top
I want dog holes in this bench every four inches, so I set up this quick jig and put a bushing in it, this will give me consistent spacing and keep my holes vertical. I got this massive brad point bit and bushing from Lee Valley.
It comes with directions to build the jig. The one thing to drilling holes like this is to remove the bit frequently to clear the chips.With that all done, I go ahead and rub on several coats of boiled linseed oil and then paste wax.
Building the Leg Vise
But that’s not all, I still need to build the leg vise for this beast. Earlier I laminated together a walnut blank for the vise chop. I measure it from the bench and cut it to length. You’ll notice I have it rested on a piece of 1/2” plywood to make sure the bottom will clear the floor.
I wanted to give my chop a nice pleasing shape, the first thing I did was taper the sides. I started with my scrub plane to hog off material until the edge was parallel with my line and there was only about 1/8” of material left to remove. Then I switched to my jointer and brought it down to the line, and repeated on the other side.
I’m going to add some other bevels to it that’ll remove weight from the bottom and get rid of the sapwood from the blank. The sapwood is just as strong as the heartwood, but I just want the whole thing to look like chocolate. I do this the same as the taper. Once it’s marked out, I go at it with the scrub plane, and then switch to the jointer when I’m fairly close.
Now I drill the hole for the screw. This would’ve been a lot easier if I’d done it before I assembled the bench and when the chop blank was still square, but sometimes I struggle with foresight. Installing it was a very straight forward matter, just screwed in the hardware.
Leg vises need something to keep the bottom from tipping in while you tighten it against whatever is in the top. I took a 1” dowel and drill some holes in it that I put pins in to serve as a stop to keep the chop upright when I use it. I drill another hole lower in the leg, tightened the chop against it, and then drilled a recess into the chop through the leg with a bit extender to make sure my alignment would be right. Then I epoxied it into the hole and applied a liberal amount of wax to the cross slide before putting it all back together, then I oiled up the vise.
The only thing left is adding something leather to the vise faces. This is about as necessary as dodging wrenches, but I did it anyway.That’s really it now, the bench is done. Thanks for following along! Don’t forget I do have plans available for this that include the leg vise details.