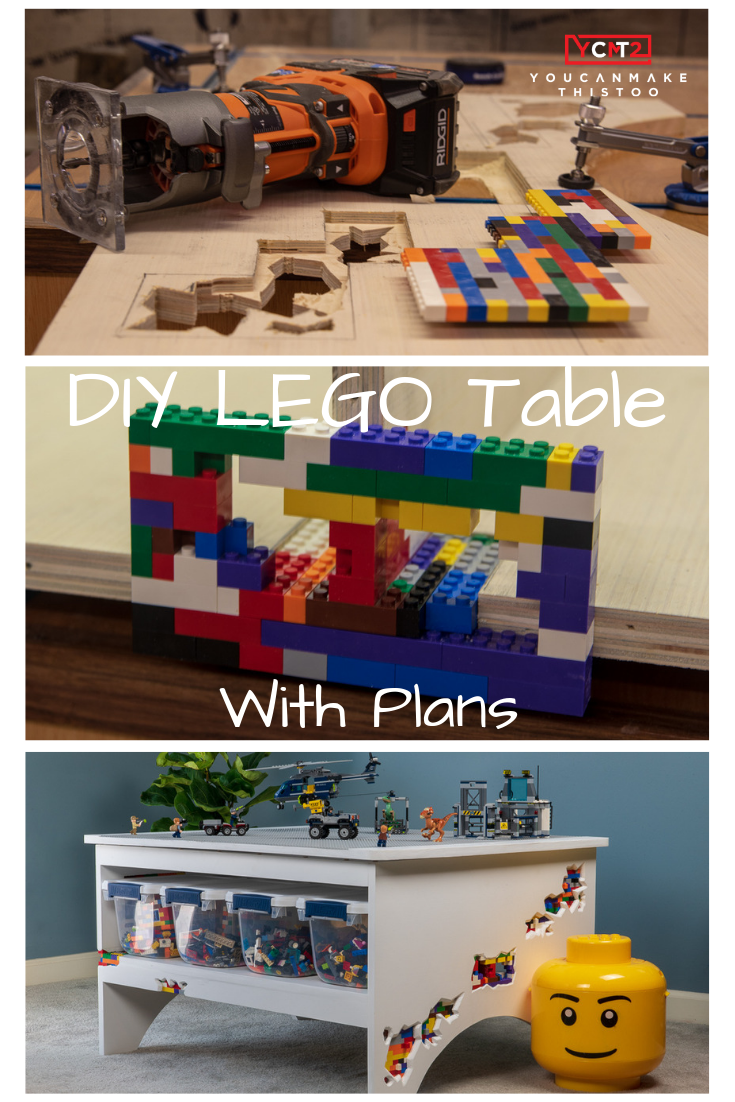
DIY LEGO Table
Check out how I made the ultimate DIY lego table. The LEGO creation inserts make this table uniquely fantastic. It also has a flip top with LEGO plates on one side and a normal top on the other.
This post contains affiliate links, for more information see my disclosures page.
This table is made from just a single sheet of plywood, some edge banding, and LEGO pieces.
Materials:
Break Down Material
I started by breaking down the plywood into manageable pieces with my track saw before cutting them to size at my table saw. But, the plywood could be cut to size with just a circular saw.A neat trick I’ve picked up to remove stickers from wood is to hit them with a heat gun for a few seconds and then they peel right up without leaving any residue.
Make The LEGO Table Legs
I wanted the sides to have arches to create feet. I laid them out by first marking where the shelf and supports would be on the side and then tried a few arches until I found one I liked, then I duplicated that one to the piece.

DIY LEGO Table Plans
An arc is just a slice from a circle, which is easy to draw with a compass, but for low arches like these the center of the circle is off the piece. I start by marking two equal points on each side of where I want the arc and a center, then I put a piece of equal thickness wood beneath my stock so my compass stays level. I use the marks to get my compass point in the right place and then draw the arc.
I cut out the curve with a jig saw and then smoothed it at my spindle sander. But if you don’t have a jigsaw, you could also use a bandsaw which would save some sanding. Alternatively, if you hate yourself, this could be cut with a coping saw and hand sanded.The last piece shaping is rounding off the corners of the top to a 1” radius to class it up and hopefully reduce the chance of a traumatic injury to my children. I do this at the router table I recently built I’m still in love with it and trying to justify having it in my shop, but it could be done with a bandsaw, jigsaw, or sanding.
Edge Banding
This table will be painted, and plywood edges just don’t paint well. So I put iron-on edge banding on every edge that’ll be exposed. It’s a fast and inexpensive way get a better paint job and make a high quality plywood hand built piece look like an impulse buy from a retailer that has groceries two aisles from their furniture.
This is the first project where I’ve needed to put edge banding on an inside curve, I figured my iron wouldn’t be a good choice, so I used a spring clamp to help hold the edge banding, a heat gun to heat the glue on the banding, and a piece of pipe insulation to smoosh them together. A J-roller would work better, but believe it or not I don’t own every tool known to man, so I make due.
Edge banding is oversized to make it easier to apply and I prefer to use a chisel to trim it down, but there are many techniques. Also, my edge banding tends to very slightly pull away at the edge in places. If you have any experience with that and some suggestions please let me know in the comments. For now, I deal with that by using a little bit of wood putty and then sanding everything smooth.
Pocket Hole Joinery
Now for joinery, I opted to use pocket holes because I’m going to assemble this twice. But if you lack a pocket hole jig, a dowel jig will work, or this table design is a great candidate for domino joinery and I’ll have links to everything below.
I’m assembling now so I can mark where all the pieces actually meet and intersect so I can design my LEGO inlays. But if you prefer simplicity and don’t like over complicating your projects, you could honestly call construction on the base complete right here and just paint it. However, I use my projects as an attempt to escape the mediocrity of myself, so here we go.
LEGO Table LEGO Inserts
I started by knolling a bulk bag of building bricks into like pieces and then built the inlays that I’ll be setting into the wood. The pieces you see me building here are a bit different than what you’ll see me using later because I sc.. reasons.
After I built the right shapes, I used some CA glue to bond them together and it’s been working fine. That’s an important note because if you try to research the right glue to use like I did, the internet will quickly tell you every glue is wrong.I add a few more marks to make sure I put all the table pieces back in the same place so the screw holes align and then take it all back apart.
Now I can mark exactly where my LEGO creations will be inserted and start removing wood. Either out of penance or artistry, or maybe that’s a false dichotomy, some of these inlays are set into joints where three pieces of wood meet.
Believe it or not, those inlays aren’t any more difficult to cut than the simple ones, I just spent a lot more time finessing them into position before marking. But, if patience isn’t your thing then make up for it with wood putty - or skip this all together and probably have a stronger table.
This three way insert I’m working on now, when I almost finished routing the pocket on the side piece I realized there was a better way. As is, I routed out a pocket the depth of the LEGO. The thin veneer left wasn’t thick enough for most tools, so I used an exacto knife to cut out a pattern that’ll reveal the LEGO.
The larger flat inserts I approached a smarter way. They had some LEGO nubs sticking out, so I marked where they hit and then drilled small pockets so the insert would sit flush against the plywood to get an accurate mark. I took care here not to be too close to any edges so the table will still be strong. Then I mark out the reveal pattern that I want to be visible.
My vision here is that the table will appear to be made of plastered over LEGO, but it’s breaking and worn, revealing the structure underneath. Hence the jagged edges and varying depths of the LEGO.
To cut out the reveal, I drill some through holes and use a jig saw to cut them out. This is also a good opportunity to bust out a scroll saw, but I don’t have one of those.Last for the inlays is to rout out the pocket so the same depth of the LEGO so they sit in the wood. This is why I made the LEGO into rectilinear shapes, it’s a lot easier to a few straight lines than some crazy lego contour.

Then I simply repeat these techniques as needed for the rest of the inlays.Some of the LEGO inserts I built with double width bricks, and some with single width bricks. The single width bricks have a lot more wood between them and the outside and the reveal holes just didn’t feel right. So I took a rasp and files added a bit of a chamfer to them. But, plywood doesn’t care for rasps and files so I came back with wood putty and sandpaper to literally smooth things over. In hindsight, my palm router with a chamfer bit probably would’ve been a much better way to go for this step.
Assembling the DIY LEGO Table
Putting the table back together went quick since some of the pieces could obviously only go one way for the inlays to line up, and the rest were marked. As I went, I installed any LEGO inserts that were held captive by the structure, but I masked them with painters tape first.
For the double brick inserts where there is only veneer covering the brick, I used wood putty to create a mild chamfer. And lastly I used a dowel rod to plug the pocket holes in the center divider that might be visible. The rest are hidden and I plan on them staying that way.
Finishing the DIY LEGO Table Top
Now to the table top. The next steps are because I want this to have a flip top. If the top was permanently installed then this is unnecessary.
I mark the the center of the plywood and then line up the plates that I’ll be gluing down later. I have flat LEGO bricks holding them together and keeping the plates properly spaced. The spacing creates a gap between that plates that I use to align it before marking the edges.
Then I go to the table saw and use a DADO stack to create a recess slightly deeper than the lego plate. This is so the top will sit flat on the base when it’s flipped over.
And with that, everything is ready for paint. I opted for white to create high contrast with the LEGO inserts.
The top needs some way to stay in position so it doesn’t just slide off, but is easy to flip over. The solution I used was to drill holes in the center of the base sides and use dowel locators to transfer the holes to the top. I drilled holes through the top at the marks and chamfered them with a counter sink bit, then glued small dowel pins into the base. The dowels register in the holes in the top to keep the top in place, but let it be picked up and flipped over quickly and easily.Because I wasn’t smart enough to do this before painting, I do some touch up paint.
Installing LEGO Inserts
Now to the fun stuff, I use more CA glue to hold the LEGO inserts in place - taking care to keep it from oozing out into the reveal, and remove the masking tape.
One of the pieces I needed to use some wood putty to cover up bad cuts, so I used an exacto knife to scrape out the bulk, and then a toothbrush with half water and denatured alcohol to brush out the rest.Since the top is flippable, I don’t want the base to mar it so I use a bunch of tiny felt pads. I opted out of using the wider pads because they were twice as thick and would have interfered with the dowel and hole mating system thing.
The last step was to glue the plates to the top. Unfortunately, I mistakenly thought I hit record and missed this step. But it’s simple, I used some slow set epoxy and brushed it around all the edges of where the plates would be, and then paint some spots in the field in the pattern of the five on dice. Some spring clamps and heavy wood served as overnight clamps.