How To Make a Fireplace Screen
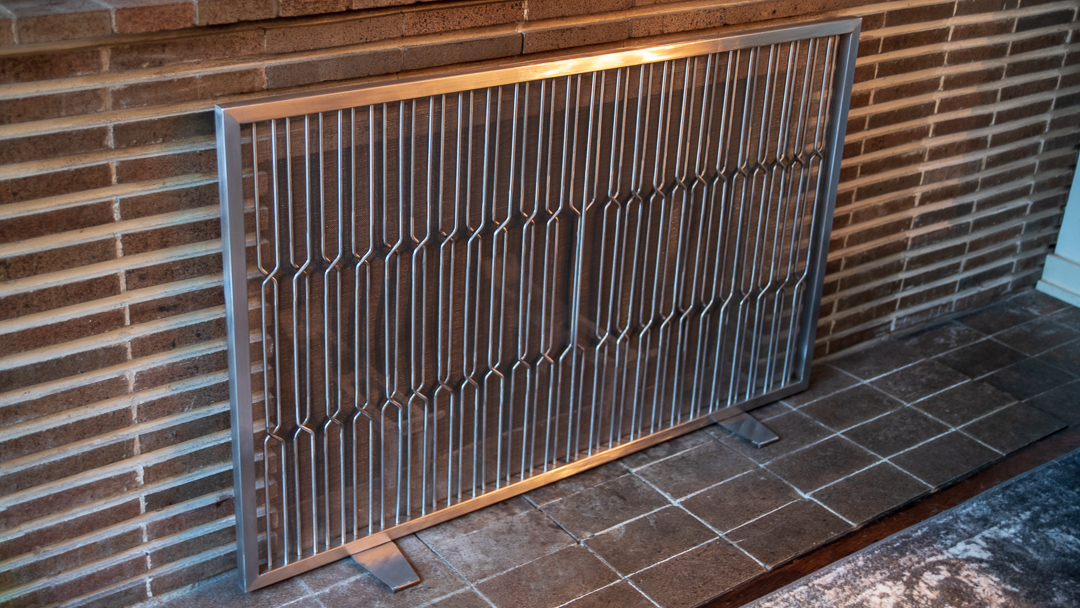

This time I'm showing how I made a modern style fireplace screen with my buddy, Eric.
Eric's Social
YouTube: https://www.youtube.com/user/barneseric83
Instagram: https://www.instagram.com/pro._creation/
This post contains affiliate links, for more information see my disclosures page.
It’s easiest to think of this build as three assemblies that go together. The frame with rods, the screen, and the feet.
We started with the frame and that meant cutting pieces down to size. All we had was an abrasive cut off saw and they’re not very accurate, especially for miters. So I marked over sized and once everything was cut we set up a jig on the disc sander to grind everything to 45 degrees. Once the angle was correct, used the jig to grind everything to consistent length.
It’s the same story as always, it’s more important that everything be identical than a certain number. When we thought it was there, we clamped it up and lightly buffed the miters to get a good look and make sure everything lined up correctly.
Once we were happy it was good, we ground bevels on the miters, this will help us get a strong weld because these will be ground smooth. If we didn’t make a bevel to put weld in, after we were finished grinding we would have removed almost all the weld and would purely be relying on weld penetration for strength.
I marked out all the holes that the rods will fit into and drilled them out on the drill press. Theoretically we could just hold and tack the rods in place, but the holes will make it a lot easier to assembly and make the end result a lot more consistent.
The holes are offset from the centerline because of the pattern we’ll be making with the rods. The rods are 1/4” thick so if we just put them in all in a straight line their thickness would prevent the pattern from working. I used a fence on the drill press to drill one side, then flipped the piece and drilled the other side. Stainless is really hard, so I drilled the holes in two steps, with a pilot bit and then the finish size to minimize how many bits I burned up.
Then we moved on to the most time consuming part of the build that kept repeating, grinding. It’s easiest to grind the pieces before they get assembled and then just touch up the areas that need it after welding.
The metal has a very slight texture on it that we need to grind through before moving on to brushing, else the texture will distract from the brushing. Flap discs and grinding discs tend to dish the material, so we use sand paper on a buffer to keep the material as flat as possible. Once that’s done, we switch to a restorer and hand sanding to do the brushing.
Now all the rods need to be prepped. We gang cut them three at a time with the chop saw and stop block to keep the length consistent. The saw deflects less with the 1/4” rod than it did with the 1” tube. We grind the slag off and put a slight chamfer on the rods at the disc sander then they get an initial sanding.
Aside from having to do it 100 times, bending the rods was probably one of the most fun parts of the build. We made this little jig to make all the bends consistent. There’s a mark on the jig that shows me how far to push my guide to get the same bend in each rod. We’re using an oxygen acetylene torch, but this could be done with a MAP gas torch or even propane if that’s all that’s available, it would just take a little longer to heat up.
After the rods were bent from each end, I set about grinding all the heat discoloration off the bends. This is my first time doing a stainless project this size, but fortunately I did come into this project with a variety of rod polishing techniques already in my skill set.
Now we’re finally ready to start doing some welding. First is welding the two uprights to a horizontal section, then once all the rods are added, it’ll get capped with the other horizontal section. These will be show welds, so they get built up with multiple passes to make sure they can be ground flat. While the weld is still quite proud we start with an aggressive flap disc, then switch to the buffer when it got low to grind everything flat.
Inserting all the rods took a special touch. It was easiest to get them all started with the frame standing up, then we laid it down to put the last frame piece on. After finagling it into place we welded it on and grinding the joints the same as before.
Next up was tacking all the rods into position. The rods tended to flop around everywhere, so we ziptied them into their pairs to make sure we didn’t mess up the pattern, cut some spacer blocks to hold everything in place, and tied down some guide strings to help align the intersection.
Each rod got tack welded on the back side of what will be the top of the frame. When you look at the piece, that area won’t be visible, so that placement means we’ll just have to clean each weld instead of grinding and polishing them all. Then each intersection got a tack as well just to hold them tight together.
Then we turned to the screen assembly. We welded up some of the 1/4” rod to form a frame to stretch and attach the screen too. The original plan was to just fusion weld the screen to the frame, but it is so delicate that even on the lowest setting the welder immediately burned it up. Eventually we settled on just using five minute epoxy to adhere the two. We sandwiched the screen between the table top and some scrap blocks to get it taut before epoxying the two together. A light touch with a flap disc did a good job of cutting the excess screen off and then grinding it flush.
From there it was a simple matter of getting the screen aligned on the back of the frame and tacking it in place.And now for the last assembly, the feet. I scratched out the design on a piece of stock and cut it out roughly with a cutting disc before grinding it to shape at the disc sander. To make the feet more stable, I welded some scrap 1/4” rod onto the ends, and then blended the foot from the flat into the rod with a flap disc.
Then the tops of the feet were polished before getting welded on. We drilled some 1/4” holes through the feet where they would meet to the frame to give more weld surface to ensure more than enough strength.
The project may seem done at this point, but actually it took about 3 more hours of hand sanding to remove the discoloration from the rod intersections that were tack welded, and to blend the corners back into the rest of the frame brushing.
Then it was done! Now all this baby needs is a fire behind it.